Wednesday, August 21, 2019

Operations Primer - Road Crew 101

While every operating session is different, in terms of what railroad you're simulating, how trains are allowed to move, etc., nearly every operating session will have people working as road crews for trains moving across the layout. A road crew might be assigned to:

  • Passenger train with limited stops and limited switching of cars
  • Through freight that is just passing through the railroad on its way somewhere else
  • A local taking cars from a yard to a town or industry
  • Combined passenger/freight train that has to make every station stop along the route
  • and many others.
Depending on the layout, a road crew may be just one person, two people (an engineer and a conductor), or even more. I got to operate on a 1/8 scale railroad and our crew had three people in it because those cars tend to be a LOT heavier. 


Finding a Session

One of the first things you need to do in order be part of a road crew is to find an operating session to attend. In this part of the hobby, you'll find that there are some layouts that never invite guest operators to participate. Other layouts have a regular crew and if you happen to know someone, you might be able to wrangle an invitation. However, there are a lot of layouts out there that are regularly operating and frequently looking for more people to participate. As I get my layout operating, I'm planning to offer an Operations 101 session periodically to help teach people how to do railroad operations, since it's easier to learn by doing than by reading, frankly. 

Most NMRA regional and national events will have at least a few operating sessions as part of the event, and these sessions are usually open to any attendee of the event. For more experienced operators, there are regional invitational events held yearly or every few years. These also require that you know someone in order to get an invitation, partially because they want to make sure they get experienced operators. 

As a new operator, your best bet is to ask your "neighbor" model railroaders to find open sessions you can attend. Check with your NMRA division or with the Operations Special Interest Group about sessions in your area.

Before the Session

Depending on the complexity of the railroad and the operating scheme, you may be able to just show up and run, or you may have some homework to do in advance. One of the features on OperatingSessions.com is to allow layout owners to upload maps, timetables, rulebooks and other documents that will be used during the session. If the owner sends these out, be courteous and read them. You may also want to print them and bring them with you. 

You should also find out if there are any unusual requirements for the session, such as:
  • Do you need to bring your own radio? If so, what type? Family radio system (FRS) radios are the most common these days. 
  • Do you need to bring a throttle? Some railroads will also support phone-based throttles. You should download the app to your phone in advance. 
  • For outdoor operating sessions, what clothing or extra equipment should you bring? For large outdoor layouts, I've had to bring work gloves and a water jug, since you could be out on the railroad for an hour or more on a single run. 
If you have allergies to pets, you should ask if the owner has pets that will cause you an issue. Asking the owner to put the pet away is inappropriate... the pet lives there, you're a guest. For instance, I fully expect that my dog, Riley, will be around the house and the layout greeting the operators. You may just need to sit that session out if your allergies are that bad. 

You should also find out if there are rules about where to park and which door to use to get into the building/house. 

In all cases, if you aren't given this information, you should feel free to ask the layout owner about any special requirements. 

Attending the Session

Be sure to thank the owner for the invitation to the session, and if the owner has a spouse/roommate/etc., be sure to thank them, as well. A little politeness goes a long way. If the owner designates a particular entry, restroom, etc. to use, be sure to only use that one. You're in their house, after all. 

When it comes to the layout itself, make no assumptions about what you're allowed to do. For instance, if a car comes off the track, some owners may ask that you not rerail it yourself for fear of damaging tiny details on the car. This is rare, but it's worth asking. Picking up equipment and moving it is generally frowned upon unless you're given special permission to do so. In a system with DCC, any issues with decoders should be handled by the owner. Don't consist extra engines or change programming without permission. In fact, many layout owners will not allow operators to bring in "full" throttles (think Digitrax DT400, DT500, NCE PowerCab) that allow for programming and will instead ask operators to only use utility throttles. This prevents accidental changes to programming.

It's never acceptable to bring your own locomotives and cars to someone else's railroad during an operating session without asking in advance. It's certainly never acceptable to do the first time you're going to a railroad. Operating sessions are set up with a particular flow of equipment, engine numbers, etc. and throwing an unknown engine into the mix just causes confusion. 

When it comes to the rest of the layout, be aware of your surroundings. One of the layouts I'm going to be operating on soon has asked that operators not wear baggy clothing or long sleeves since that clothing can catch on the scenery and the turnout stands. 

Most owners will want to know about trouble spots or equipment that has issues. They may ask you to fill out a quick form explaining what problem you had, so that they can fix the issue after the session. Just like software development, some issues don't appear unless you've got multiple people running the layout simultaneously. Providing feedback to the owner will make for better sessions in the future.

Prior to starting the session, most owners will have an operator briefing. The owner will explain a little bit about the railroad and any important rules you need to follow. Pay attention to this briefing, as it will help alleviate potential issues later.

You may get a choice of jobs, you may be assigned a job, or it may be a random selection. When it comes to signing up for jobs, you need to be aware of your own limitations, especially if you're new. Being put with a more experienced operator should not be looked at as an insult; instead, take the opportunity to learn how the layout works, how the trains flow, etc.


Job boards at Andrew Keeney's Nashville Road layout. Operators sign up
by putting their 
magnetic nametag next to a train or job, and the
trains on the left are lined-through when completed. 


Personally, while I like working yards, on a new layout, I always like to sign up for a train that is going to tour a large part of the railroad. This isn't always possible, depending on the layout, but it's something I try to do. There have been sessions where I didn't do this and I missed out getting to see a train run through the entire layout. It's a good way to see all the locations along the route and you may find a town/district/job that is of interest as your next job.

Running Your Train

Now you've got a job assigned, you're working either by yourself or with a partner, and you're ready to roll, right? 

Well, maybe not. Your job should at least tell you where you need to go on the layout to pick up your train. You may be getting a train from:
  • Visible or hidden staging tracks where the train is completely assembled
  • A yard where the cars may be assembled with or without an engine
  • An engine facility or parking track where you are picking up a lone engine (with or without a caboose) as the start of a local job. 
Assuming your train isn't coming from staging, you may or may not be able to start right away. On certain layouts, a hostler is the person who moves the engine from the engine facility/roundhouse out to the track where your cars are. The yardmaster may not have assembled your train yet, in which case you'll need to wait. You can let the yardmaster know you're ready for your train and in theory, the dispatcher or session manager should not have assigned that train to you yet. The yardmaster may send you back to find a different train to take out. 

You'll probably get a deck of car cards or a list of cars in your train. Be sure to verify that the list matches what you have in your train. If you're missing cars or have extras, bring it to the yardmaster's or dispatcher/traffic manager's notice. 

At a certain point, you'll have your engine and know how to control it, either with a DCC address or with a traditional DC throttle. Even before I've left the yard or parking location, I will ensure that I have control over the locomotive, typically by turning the headlights on/off, making a whistle/bell sound, or something similar. This lets me ensure that I can move the train without actually moving it yet. 

The cardinal rule to remember is that no trains move on the mainline without dispatcher permission. The permission may come in the form of verbal or written orders, or you may get a signal indication. If you are getting verbal or written orders, make sure that you know how far you can go before you start moving. Once or twice, I have overrun a block because I did not see the block marker. As a result, I always look a bit ahead to make sure I know where my next stop is. When you're running on a signaled layout, you're looking for the next signal for your track. Just like when you're driving and approaching a signal, you should assume you need to stop and slow down accordingly. 

When it comes to locomotive sounds, defer to your host's rules on this. If you're going to use the sounds, you should use them properly. Do you need to blow your whistle/horn at a road crossing? Do you need to use a bell at certain times? Ask your host before you blow out people's ears. 

As you're working your job, be sure that the cars are going exactly where they are supposed to go. If the layout specifies a "spot number" for the car in front of an industry, that's where it needs to go. If you need to move cars to get to that spot, make sure that the cars you moved end up in exactly the same spot they were when you started. It is never acceptable to pick a car up and move it because it's easier to do it that way. 

Assuming you get all the tasks done for your job, your train will need to terminate somewhere. It may go into a staging track, go back to a yard, or go back to the engine facility/roundhouse. Follow the instructions you're given. The final step is usually to let the dispatcher or traffic manager know that the train has terminated and that you're taking a break or you're ready for another train. Make sure you turn in any paperwork, binder clips, or other materials you were given. Uncoupling tools tend to find their way into aprons and out of the railroad owner's home way too often. 


Wrapping Up

Hopefully these suggestions about etiquette have not scared you from wanting to operate trains. 99% of railroad owners are flexible about nearly everything related to the session, but the "rules" I've listed are because I've run into these issues at a session here or there. Most railroad owners are in it for the fun, but occasionally you get the owner who wants to exert authority over plastic toys and ruins the enjoyment for everyone. 

If you have other experiences or rules that I didn't list, please send them to me at eric@northcomp.com so I can add them to my list. 

Thursday, August 1, 2019

July 2019 Construction Journal

Helix Construction


7/4/2019 - Over the July 4th holiday, I did quite a bit of work on the helix. For starters, I got the rest of the lumber cut for the helix and the connector modules. I also turned my curve template into a track guide that I could use for drawing curves into the plywood. This makes it easier to get the roadbed installed in a clean manner. 

I also discovered that the previous elevations on the first layer of the helix were incorrect. The first curve started higher than I had originally anticipated (1.5" up) and while the first two quarter curves were OK, the third one was not rising nearly enough. I removed the riser blocks, remeasured, and now I've got the right grade in place. I got the cork secured to the first helix deck this morning using ALEX DAP Clear Caulk, as usual. 


After getting the heights adjusted, I put down a short piece of track and checked the clearance with a double stack car, which is the tallest car I have. Even at the exit from the helix, there's still plenty of space. There's also enough space on either side of the track, even when you account for the spacer blocks. 


While I was cutting the other lumber, I also burned through my scrap pile to make about 120 4" high spacer blocks out of the 1x4 material. 


7/6/2019 - After the roadbed adhesive was dry, I laid the Atlas Code 83 concrete tie track on it. I put down a thick bead of caulk and then spread it with a putty knife. With very little work, the track lined up with the center line of the cork and I used my Fast Tracks Sweepsticks to help maintain the curve alignment, especially where the pieces of track were joined together. The end result was a smooth double track section of track.


7/9/2019 - I wired up the inner and outer loops using 20 gauge feeders connected to 14 gauge bus wires. One of the limitations of the RR-Cirkits detection coils is that you can only fit three wires through the middle, so instead of running the feeders through, I'm running the bus wire through the coil to a terminal strip. There will be one terminal strip for the outer loop, one for the inner loop, and one for the common wire. The Watchman board will be mounted on the inside of the helix and then connected into the LocoNet/Simple Serial Bus wiring.


After getting the first layer of track wired up, I added the next layer of lumber and support columns. Once I made the final corner, I don't have to cut custom supports for each layer -- I just grab more from my pile of 4" blocks. I'm using wood glue on the bottom of the 4" blocks and screwing into the top using drywall screws. I'm also using clamps to help provide a good seal. 


7/10/2019 - Continuing work on what I did the night before, I laid the rest of the roadbed and since the caulk set up quick enough, I went ahead and laid the track too. For the outer loop, I cut all the pieces first and then tried to put them into the caulk. However, I ended up having to adjust the rail. For the inner loop, I put down one piece at a time and it was a smoother process. After getting the track down, I glued down the spacer blocks all the way up the incline. 


7/11/2019 - I continued working my way up, adding the next plywood sections on top of the spacer blocks. 


7/14/2019 - Unfortunately, the next layer of plywood got in the way of adding roadbed and track. The end of the previous deck's track ended in a somewhat difficult place to reach. However, I was able to get the roadbed and track connected up. At the end of this deck's track, I added the track to the end and secured it as far as I could. This will make it easier to connect up the next layer of track. 


7/15/2019 - I finished wiring the track and glued down the spacer blocks. These take a while to dry, so that was it for the night. At this point, the front of the helix is 12" high, it's heading to 21" high to connect to the wall to the left. 


7/17/2019 - I added the plywood and roadbed to create the next layer of the helix tonight. I had waited to add the last spacer block, so I went ahead and glued that down and screwed the plywood into it. The clamp will help make a good glue joint. With the plywood down, it will be easier to run the bus wires for the previous deck and get the feeders connected up to them. The front of the helix is now 17" high from the support table to the top of the plywood. 


7/24/2019 - I glued down the track to the roadbed on layer #3. I also glued down the next set of spacer blocks to support layer #4's plywood subroadbed. 

7/25/2019 - I was unhappy with the look of the duct-taped bus wires running all over the inside, so I got some plastic wire clips. I added those clips on the support blocks and then snugged the bus wires at the end of the run with additional suitcase connectors. This keeps the wires loose enough to prevent pulling but keeps them from getting in the way. I also hooked up the feeders that weren't connected to the bus wires yet and ran trains up both tracks without any issues. I also figured out that I need to replace the three four-circuit terminal blocks with a ten-circuit block and one four-circuit block, since I need five bus wires to reach the top of the helix. 

7/31/2019 - I topped out the helix tonight when I added the last layer of plywood. I'll still need to add the horizontal connectors to the wall after I get the roadbed and track laid down, though. 


South Wall


7/4/2019 - The south wall of the layout is where I'll eventually connect my peninsula, but for now, it's connecting track from the east wall to the helix. I got all the lumber cut and ready to be assembled. 


7/6/2019 - I got all six benchwork sections assembled and put up more shelving brackets. I had to remove a door that the contractor put in to take advantage of space under our fireplace. I decided in case I needed access, I'd rather have the door off its hinges than have to rip out benchwork in an emergency. 


There will be two more sections (one upper, one lower) of benchwork to finish the connection to the back room. In the back room where the helix is, there will be one 8' section on the bottom and one 4' section on the top. The bottom sections will have Homasote and plywood tops, while the upper sections will just be plywood on an open grid section. I'll fill it in with scenery sometime in the future.

7/25/2019 - I installed two more vertical standards on the south wall and fitted the modules into their spaces. I'll have to adjust the bottom module because either I mis-measured the wall or something has moved. 

DCC/Electronics/JMRI


7/5/2019 - I continued making progress getting blocks wired up to my RR-Cirkits Watchman boards. I realized too late that I should have soldered the leads to the coils while sitting at my worktable instead of trying to do it under the layout. I only have three more to do under the layout, after which I can correct my oversight. 

I also did some rework on my panel layout. In a previous post, I used the classic CTC machine graphics as a backdrop, but decided that I wanted a more modern looking panel. In addition, I wanted more of the layout to fit on a single panel screen. I'm also using a smaller indicator in the track to indicate occupancy. 


All the turnouts shown here are now wired up. I'm using the dashed line to indicate track that is not being detected. In block 100 on the upper track, I'll add my staging yard turnouts. The other end of 103 will be the west end of the yard with the crossovers once I get those turnouts wired up. The other alternative to the small indicators in the track are the larger ones, shown here:


I removed the CTC background on this panel and set the background color to the neutral gray color. 

Sunday, June 30, 2019

June 2019 Construction Journal

Helix Construction

After getting the majority of the curves cut, the next step is to build the support structure for the helix. Based on a suggestion from Brad Rotert, owner of the B&O Decatur Sub layout, I'm using the same box design to support the helix as I've been using on the rest of the layout so far. Each section will be 12" x 60" with 1/2" plywood tops on 1 x 4 lumber, probably with a 1 x 4 cross member in it. The boxes will be arranged so that they make a square 72" on a side. The helix will sit on top of the box and some of the inside curves will hang over the edge of the box. Each layer will be well-supported by the layers underneath, so a little bit of overhang is not a concern. 

The lumber cut list is as follows:

  • (4) 12" x 60" 1/2" plywood - tops
  • (8) 60" 1x4 pine - box sides
  • (12) 10.5" 1x4 pine - box ends and crossmembers

The boxes will be bolted to each other and I'll make a leg pocket in each of the four corners. If one leg is not enough, I'll add more legs around the outer perimeter and possibly the interior perimeter, if necessary. 

Stack of curves to build the double-track helix.The inner track is 30" radius, the
outer track is 32.5" radius. Each piece is 7.5" wide, which accounts for track
spacing and for allows room for the support blocks. 

I got the boxes all built and laid out a circle on top to see if everything fits, and it looks like it does. The next step is to bolt the boxes together and cut the legs.

The support platform is 72" square and each section is 12" wide. There
is a small overhang in each corner but since the helix will be secured
to the boxes, this is not a real concern. 

The four support boxes got leveled and bolted together and then we started assembling the lower level entrance/exit with the other curves. 


We connected the first course of curves together using 1/2" plywood "plates" and some 1" wood screws. As the helix goes higher, I'm planning to use 4" wood blocks that are glued on the bottom and screwed in the top. This will let the blocks line up vertically and eliminate the need for a guard rail around the helix itself. Later in the week, I got all the blocks screwed down and I've got a nice smooth curve heading up. The next step is to draw the track alignments and lay down cork and track for the first course of the helix.


DCC/Electronics

After getting the right parts from RR-Cirkits and some education on how to make cables, I was able to get the east end yard crossovers and the arrival/departure turnouts wired up with Tortoises. It's so satisfying to hear that motor run when you click the icon on the JMRI panel.

Besides the five I installed tonight, I bench-wired the rest of the Tortoises I had, since it's far easier to do that than work above my head. Of the Tortoises that are left, 5 go to the west end of the yard (2 crossovers and the turnout between the two arrival/departure tracks), 4 go to the pair of crossovers to the east of the yard which allow access to staging and to the industrial district, and 3 more are heading elsewhere, probably to the industry tracks on the upper deck that are slightly out of reach.

Bench wiring Tortoise drives is far easier and safer than doing it under the layout. 

I also had to use longer .025" piano wire to reach the track, got it at Hobby Lobby. It's much easier to work with a longer wire and trim it than the included wire if your benchwork is thicker than they expect. To make it easier to mount the Tortoises, I used Scotch double-sided foam tape. This stuff is insanely strong and the screws are an afterthought, especially since some of the locations are impossible to reach with a screwdriver.

The next step in this project is to wire up the two remaining crossovers at the west end of the yard, as well as the turnout accessing arrival/departure tracks 1 and 2 in the yard. That will use up all 8 ports on the Motorman board, so I'm getting more on order. One of them will handle the mainline turnout on the upper deck right above the yard, as well as other turnouts down the line. Two of them will be used in the staging yards, which will allow me to do push button routing. I was going to wire each turnout individually but these are so much nicer and easier to work with, I decided to spring for the components.

I finished running feeders to the west end of my main yard. It turns out the parallel jaw pliers I got for making the 10 connector cables also work great for clamping down my suitcase connectors. The magnifying lamp I purchased from Menards makes it much easier to see what I'm doing, both above and below the layout. I put the lamp on my IKEA tool cart and can push it around to where I need it.


Friday, June 14, 2019

Scenery Bookmarks

Articles and videos related to scenery for later use.

Speed Ballasting


Thursday, June 6, 2019

Operations Primer - Introduction to Traffic Control

If you’ve got a model railroad layout of any size, are you running your trains or are you operating them? This may sound like a stupid question, but there’s a difference between just running trains and operating them. In the real world, each time a locomotive moves on the railroad, it’s for a reason. The locomotive may be dropping cars at an industry, picking up cars that need to be delivered elsewhere, or it may be on the front of a train hauling passengers across the country. When your model trains move, are they moving with a purpose?

When we talk about operations, we are talking about simulating real world railroad traffic on a miniature scale. There are two primary aspects to operations that we simulate:
  • How do trains move across from one point to another on the railroad?  
  • How do we simulate moving goods and passengers between locations on (or off) the railroad?  

When I visit railroads during open houses, I love seeing trains running through the various scenes on the layout, as do most visitors. However, I find that running trains in a circle tends to get boring over time. By adding an operations model to your railroad, you can increase your enjoyment of your layout, no matter how big it is.

These articles are designed to introduce operations in an easy-to-follow, step-by-step fashion. Operations can get highly complex but you can start out simply and work up to the level that you’re comfortable with. In this article, we’ll start by talking about traffic control on a layout.

Traffic Control 

In the real world, trains don’t move without permission. How the engineer and conductor get this permission varies, and all of the methods can be used on a model railroad layout during an operating session. If you’re running a single train by yourself on your layout, this section may not be for you. The minute another operator is involved, you need to have some sort of traffic control system.

Line of Sight 

If you’re switching on a small layout where you and another operator are the only people on the layout, you simply need to coordinate with the other operator so that you don’t run into each other. You can add some realism to this. If you’re operating in the days before radio, you couldn’t just talk to each other. Even on a 4’ layout, that’s 348 feet in the real world, which is about the length of a football field. In this case, you can use hand signals to communicate with the other operator. I have been at operating sessions where hand signals were required between the engineer and conductor while switching cars, etc.

These hand signals are taken from the Consolidated Code of Operating Rules, 1967 Edition, hosted by the GN-NP Archive at www.gn-npjointarchive.org. This common set of rules were adopted by all the major railroads in the US at the time and the signals are still the same today, even though we have radios now.


Verbal Orders

In this system, a train crew asks permission from the dispatcher to take their train through a particular section of track. Without that permission, your train can’t move on the mainline. Trains within yards can do whatever they need without asking the dispatcher permission, as long as they stay within the boundaries of the yard, known as the yard limits. There may also be trains doing switching within towns/cities/districts on the layout where they are off the mainline, those trains are also not affected.

Verbal orders are also known as “Mother may I” operations, since you have to ask the dispatcher (you might not want to call them Mother, though) for permission to move. These are also the simplest to implement. You only need a few things:

A dispatcher who is accessible by voice, radio, or lineside telephone. Family radios are inexpensive and your guest operators probably have them already. If you use these, I’d recommend asking people to wear earpieces to cut down on the noise in the train room.

A diagram of the track plan and a way to mark where the trains are. This can be done on paper, a whiteboard, or some sort of magnet.

An engineer or conductor calls the dispatcher and asks for permission to move their train. The conversation might go something like this:

Engineer: UP 3546 (the lead engine number normally) to Dispatch.

Dispatch: Dispatcher, go ahead.

Engineer: UP 3546 requesting permission from <location> to <another location>.

Dispatch: (Dispatcher checks the board to ensure that the train can safely proceed) UP 3546 cleared from <location> to <another location>.

Engineer: UP 3546 cleared from <location> to <another location>. (Repeats the instruction for clarification)

Dispatch: Read back correct, dispatcher clear.

In the real world, there are a lot more rules on how the orders have to be recorded, numbered, etc. but we’re trying to keep this simple.

Timetable and Train Order 

In the days before signals, there was no way to contact a train that was underway except by sending orders to the stations along the way. There were no lineside signals that indicated whether a track was clear or occupied ahead of you. As a result, train crews had to rely on their timetables and train orders (abbreviated TT&TO) issued by the dispatcher through the stations along the way.

A timetable listed the trains that were scheduled to operate on a section of track. Each train was listed with its station stops, the arrival and departure time, and what priority the train got in relation to other trains. Passenger trains and other high priority trains got the highest priority, and every other train had to get out of the way. Other freight trains might be considered second or third class and be handled in that priority order.

For changes while the train was moving, the dispatcher would rely orders to station agents by telegraph or telephone. The station agent would record the orders on slips of paper and in a book, and then turn on a signal light indicating to the oncoming train that it needed to stop for orders. In some TT&TO layouts, the conductor is required to sign a book at the station. In cases where an oncoming train has to wait until another train has gone by, the oncoming train looks at the book to see if the other train has already passed.

TT&TO systems almost always use an accelerated clock, known as a fast clock, to simulate railroad time and allow trains (especially passenger trains) to run on a schedule. Since it won’t really take hours to get from point A to point B on a railroad, the fast clock speeds up time so that trains can still run on a schedule that might run at 3 or 4 times normal speed.

Modern timetables still exist, but they focus more on the routes that trains take, the rules and restrictions for sections of track, and so on. This is a link (at time of writing) to a Union Pacific timetable for around the Denver, Colorado area:

http://denversrailroads.com/Denver/Timetables/UP_Denver_TT4_11-16-09.pdf

Fast clocks are often used on modern railroads when passenger trains are worked into the operating scheme. The question is whether freight trains have to get out of the way or not. Amtrak, for instance, operates in lower priority to freight on the freight railroad tracks they use. You might choose to adopt the old school priority and make passenger trains still the highest priority traffic. Having to work around a passenger train that has to stay on schedule can add a degree of difficulty to your operations, if you choose.

There are entire books written on TT&TO operation, but I'll do an introductory article on this in the future, as well. If you're involved in the NMRA Achievement program, that program requires a timetable and train chart to be turn in as part of its requirements, even if you're not planning to use it on your layout.

Signals 

Signals are similar to traffic lights that you're used to when driving or riding on highways, with a few minor variations. Railroads like Union Pacific and BNSF have a single dispatch center for the entire country, where a dispatcher is responsible for a section of the railroad. The dispatcher is watching where trains are going and where they need to go and lining tracks accordingly. The engineer follows the signals along the track and they’ll know whether they can go, slow down, stop, or switch tracks. No radio communication is required for the most part unless the train needs to do something special, like occupy the main while doing switching. There are many variations on what signals look like within the US and outside the US, but the meaning of the signals is reasonably easy to find.

Model railroads with signals are fascinating to operate on, but putting functioning signals on the layout requires a lot of electronic hardware. If you want to build a completely automated system, the hardware has to know when trains are sitting on particular tracks, which direction the turnouts are thrown, and you need some sort of software to control the whole thing.

In the April 2017 issue of Model Railroader, Bruce Carpenter talks about his paper signal system. The dispatcher walks around during the operating session and puts up paper pictures of signals that the operators need to follow. Here’s a link to this article where you can download the templates:

http://mrr.trains.com/how-to/track-planning-operation/2017/02/paper-signal-templates-for-your-model-railroad

I eventually want to use signals on my layout, so I'll cover those in a future article.

Conclusion 

I hope this article gives you some ideas on how you can start to implement operations on your own layout. If you’ve got a layout that you would like help implementing operations on, please reach out to me at eric@northcomp.com. I love operations and would love to help get your layout operating, too.


Sunday, June 2, 2019

May 2019 Construction Journal

Layout construction has been on a bit of a hiatus recently because I've been knee deep in software development. It originally started as the registration system for the Southeast Michigan Ops Weekend, but has since morphed into an entire registration system focused on model railroad operating events. The new site is at www.operatingsessions.com and I've got pages of new ideas for it. I'll run it out of pocket for now, but eventually I'm hoping to be able to sell sponsorships/advertising/etc. to help to pay for the costs.

Week of May 19, 2019

The next big step in layout construction is to build the helix. It will go in a backroom in the basement and then be connected into the rest of the layout. I'm planning to build it as a self-standing unit so that I can work all the way around it instead of having to stay in the center of it the entire time. Here are the details:
  • Atlas Code 83 track - concrete color, since it's mainline track
  • Cork roadbed
  • 30" inner radius, 32.5" outer radius
  • Starting height: 36", Ending height: 56" - slight grade to connect with 57" upper deck
  • 4.5 turns
  • Track will be broken into multiple blocks to allow for detection -- probably one block per deck
  • Decks separated by 4" 1x4 blocks
Based on the track radii and the space required for clearances, each quarter piece of plywood will be 7.5" wide:
  • 3/4" outer space for spacer block
  • 3/4" inner space for spacer block
  • 3" for each track and roadbed
To determine how much material I needed, I cut a template curve and then placed it on a spare piece of Homasote. Based on how the curves can be cut from it, I will be able to cut 8 curves from each piece of plywood. Because I had a spare partial piece of plywood, I was able to get three curves from that spare piece. 

For a support structure, I'll be building 4 1x4 boxes with 1/2" plywood tops:
  • (2) 66" x 12" boxes
  • (2) 42" x 12" boxes
I'll use either 2x2 or 2x3 legs on the four corners of this structure that will be bolted together.

Week of May 26, 2019

The weather has not been overly cooperative lately, but I was able to get out and get lumber at Menards this week. I picked up enough to build the helix, the supporting box structures, and the connecting modules that will go on the walls. In between my daughter's high school graduation and upcoming open house, I'm hoping to start making progress on the next sections of the layout. 

I got my template curve cut first, which is designed for parallel curves at 30" and 32.5" radii, respectively. That gives you 4.5" of space to start. The spacer blocks are 3/4" wide on either side of the track, and I add in some extra space for clearance. After tracing the template onto the 4x8 sheet of 1/2" plywood, I was able to get 7 curves cut from a single piece of plywood. Unfortunately, my jigsaw batteries take a while to recharge, so I get a break in between cuts. On the second piece of plywood, I was a little more careful with my alignments and managed to get 8 curves out of it.


That gives me a total of 18 quarter curves to work with, which should be enough, but I have spare plywood to take care of the rest of the subroadbed that I need. 

Friday, May 31, 2019

Signaling options with DCC, Digitrax, and JMRI

I'm planning to eventually include signals on my layout since those are hallmarks of modern railroads. I've already started installing detection blocks as I'm building the layout, but adding signals will require more hardware and software. This page is a bookmark of videos I've found dealing with adding signals using Digitrax and JMRI.

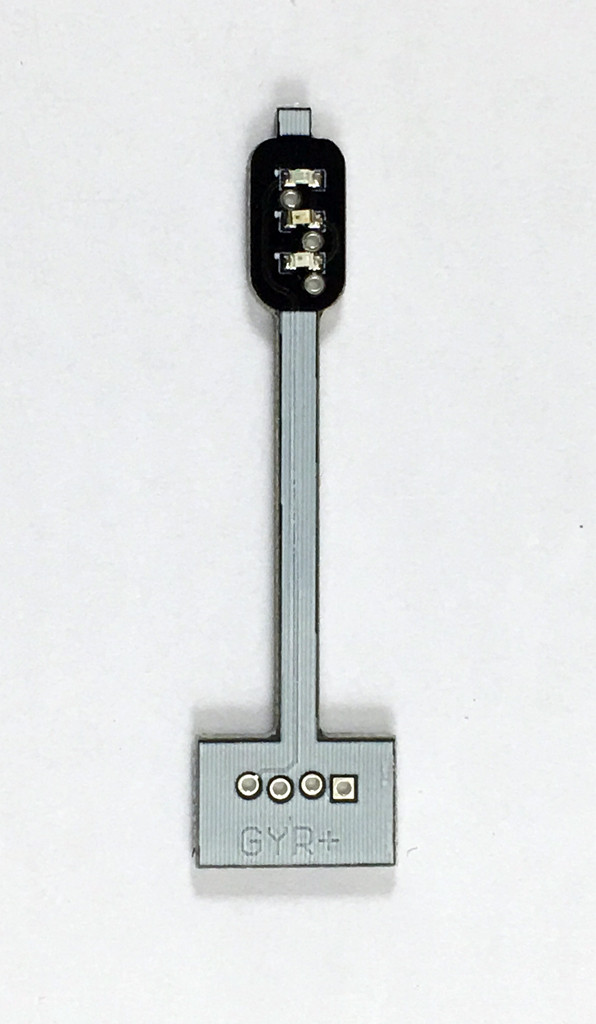
One of the recent developments is a set of simple, low cost signals that are available from Model Railroad Control Systems. These signals are just LEDs mounted on a silver piece of PC board, but they cost $14.99 for a 12 pack. Leaving out the cost of the signaling hardware, you can have a signal up for a buck and a quarter.

http://www.modelrailroadcontrolsystems.com/simple-low-cost-signals-single-high-head-12-pack/

Single high signal, looks about right for HO.  Comes in 12 pack.

These look like a good stand-in until I can afford to put in the fancy realistic signals, which will set you back a lot of money.

Virtual Signals Demo


JMRI Signaling Part 1


JMRI Signaling Part 2


JMRI Signaling Part 3